Preparing Your Site for Flap Barrier Installation

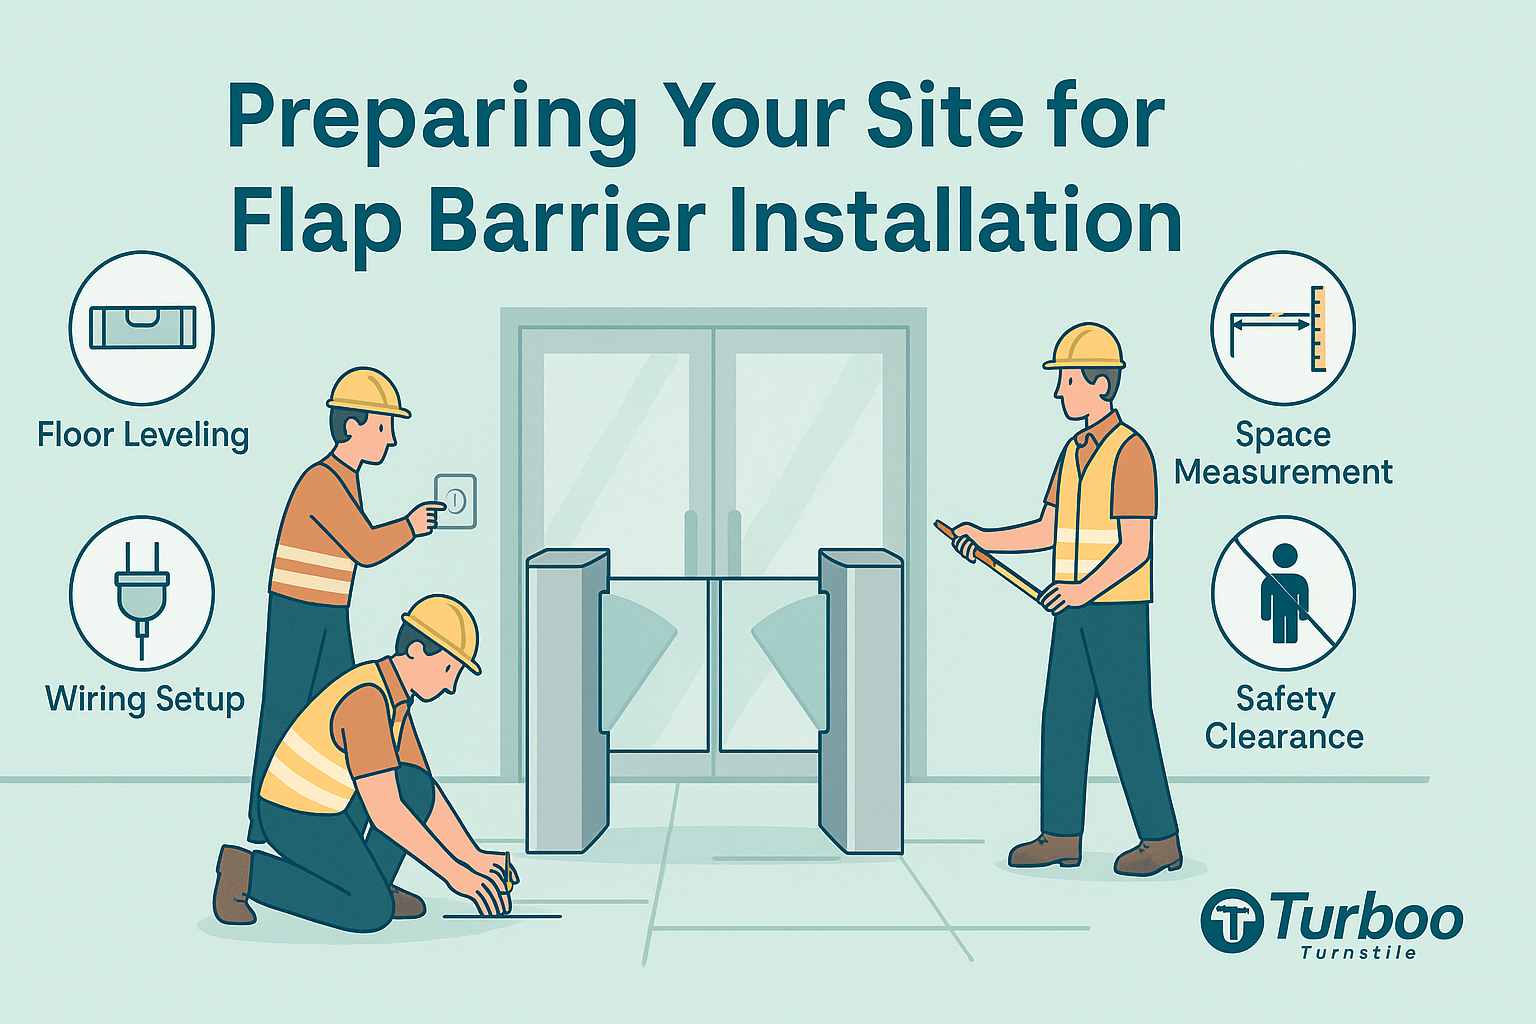
Installing a flap barrier is more than just setting up equipment. The real success of the project begins before the first tool is used. It starts with site preparation. Often overlooked or rushed, this first stage determines whether the installation goes smoothly or becomes a source of delay and added cost.
Many contractors and facility teams underestimate the impact of flap barrier site prep. But poor prep leads to slow progress, unexpected rework, and even system faults after completion. On the other hand, a well-prepared site allows the crew to work efficiently and helps avoid surprises during installation.
This guide is designed to walk you through every aspect of site setup. From assessing surface conditions to planning power access, from checking traffic flow to confirming safety compliance, each step plays a critical role in barrier performance.
By following these practices, you will avoid downtime, meet installation timelines, and ensure long-term reliability. Let’s begin with one of the most important but often skipped tasks—assessing the site before the first bolt is drilled.
Assessing Site Conditions Before Installation Begins
Every flap barrier installation begins with a close look at the environment. Checking the site early helps catch any issues that would slow down or complicate the work later. A proper assessment includes a walk-through of the planned area, measuring dimensions, noting entry and exit points, and checking for obstructions.
The goal of this inspection is to understand what the space can support. Is the floor strong enough to hold the barrier? Are the existing electrical points within reach? Can users approach and exit the barrier without crowding? These questions must be answered before any installation can proceed.
Looking at the site in person—rather than relying on blueprints alone—often reveals surprises. There may be unlevel flooring, unmarked utilities under the surface, or space limitations that weren’t visible on paper. Identifying these early prevents unnecessary tool adjustments or mid-install design changes.
Evaluating the site also gives the installation team a chance to plan placement accurately. They can decide exactly where to put each barrier unit, ensuring clean movement paths and proper alignment with entrances and exits.
A site that has been evaluated thoroughly allows technicians to work confidently. It ensures that tools, materials, and hardware are suited to the location. Skipping this stage puts the entire project at risk of delays and added costs.
Confirming Floor Stability for Long-Term Barrier Performance
The surface where the flap barrier sits must be stable and durable. If the floor shifts, cracks, or sags, the barrier’s performance will suffer. Flap barriers are heavy devices. They use motors and sensors that rely on solid mounting to stay aligned and function properly.
Unstable floors cause the barrier frame to twist. This affects the flap’s movement. The motors may work harder than needed, and sensors may misread users or fail to trigger at the right moment. Over time, this leads to mechanical stress and early system failure.
Before the installation date, check that the floor is level, sealed, and able to support weight without flexing. For concrete floors, test for cracks and surface breaks. For tile or synthetic surfaces, ensure that the finish is not loose or shifting.
If the floor is damaged or unlevel, repairs must be done before mounting the barrier. Trying to adjust the barrier to fit a bad surface is not a solution. It only masks the problem temporarily and makes calibration harder.
A strong foundation supports accurate installation. It helps the system stay aligned, minimizes long-term wear, and provides confidence to the end user. That’s why confirming floor readiness is a must in every flap barrier site prep checklist.
Checking Entry and Exit Flow Patterns
Flap barriers manage access—but they also shape the movement of people. That’s why traffic flow analysis is a major part of site preparation. If users can’t move smoothly through the entry or exit, the barrier becomes a problem instead of a solution.
During prep, observe how people currently enter and leave the area. Do they come in groups or one at a time? Is the movement constant or only during peak hours? The answers help you decide how many barrier lanes are needed and where they should be placed.
It’s also important to ensure that there’s enough clearance around the barriers. Users should have space to line up, scan credentials, and walk through without squeezing or turning. If the space is too tight, users may hesitate, and tailgating becomes more likely.
For buildings with accessibility needs, the barrier layout should allow room for wheelchair users and other assistive devices. This isn’t just a design preference—it’s a legal requirement in many regions.
Checking the flow also means reviewing where users go after passing through the barrier. Are they guided toward an elevator, a lobby, or an open workspace? The post-barrier environment must support the same ease of movement as the entry point.
When barriers are installed with user flow in mind, they become part of a welcoming, efficient experience. But when traffic patterns are ignored, even a perfectly installed barrier can cause frustration.
Planning Power Access Points for Barrier Units
Every flap barrier system requires power to run. Planning power access is an essential part of installation readiness. It ensures that the system operates safely and without electrical strain from day one.
Before work begins, identify all nearby electrical panels and outlets. Measure the distance from the panel to the proposed barrier location. Longer distances may require additional conduit, larger gauge wires, or a dedicated circuit.
It’s critical to make sure the power supply is stable. Fluctuations or overloads can damage internal barrier components. Surge protection should also be included to guard against voltage spikes from other equipment or the building grid.
In some installations, power must be routed through tight spaces, under floors, or within finished walls. Plan these pathways early so there are no surprises when routing wires or installing conduit.
If the system includes network-based access controls, plan for data lines as well. Many installations now require both power and Ethernet access at the barrier location. These must be run separately and with care to avoid interference.
Well-planned power access supports both immediate install success and future reliability. It removes the risk of slow startups, power resets, or sudden shutdowns—and gives peace of mind to both the installer and the client.
Ensuring Compliance with Safety Guidelines
Safety is a top priority in every installation project. That includes both user safety and installer safety. When preparing a site for flap barrier installation, all local and national safety standards must be followed. This ensures not only legal compliance but also smooth daily use for everyone who interacts with the system.
Start by confirming that the barrier placement will not block emergency exits. All escape routes must remain fully accessible and clearly marked. If the barrier is near a fire exit or safety door, double-check spacing and signage to avoid obstruction.
Pay attention to required clearances around the barrier. Users need space to approach, wait, and exit without being bumped or boxed in. This is especially important in high-traffic environments where people gather during peak times.
Review local building codes and electrical regulations. Most jurisdictions require specific spacing, conduit types, and load ratings for powered access control systems. You can refer to OSHA and safety guidelines for up-to-date compliance recommendations.
For outdoor or semi-enclosed areas, check for weatherproofing needs. Water exposure, condensation, or temperature changes can create shock risks or sensor failures if not addressed during planning.
Make sure your crew also works within safety rules. Mark off work zones, use signage, and wear proper protective gear. All wiring should be handled according to electrical safety codes.
By addressing safety early, you create a site that’s ready for both installation and long-term operation. Safe design builds trust—and prevents the kind of issues that lead to injury or legal action down the line.
Coordinating with Installation Teams for Efficient Setup
Proper flap barrier site prep isn’t just about the physical space. It’s also about preparing the people involved. A coordinated team works faster, communicates better, and delivers a more polished result. Coordination starts well before the install date.
Schedule a team meeting to review the site plan. This includes discussing equipment lists, tool needs, layout markings, and installation timelines. Every team member should understand their role and how their part supports the whole process.
If external vendors are involved—such as IT teams for access control or electricians for conduit work—they should be brought into planning early. Waiting until install day to coordinate often leads to delays, missing parts, or rework.
Communication should be clear and constant throughout the prep phase. If any site conditions change—like flooring repairs or construction delays—inform all involved teams immediately.
Use shared documentation. Floor plans, wiring diagrams, and equipment checklists should be available to every crew member. This prevents confusion on the job site and helps align expectations.
Teams that prepare together work better together. With a shared plan and strong coordination, installations move faster, smoother, and with fewer errors. That’s why effective team setup is a cornerstone of proper installation readiness.
Using a Site Needs Guide for Reference
Even the most experienced teams benefit from having reference materials on hand. When preparing for a flap barrier install, use a detailed flap barrier site needs guide to support your decisions and planning.
A good site needs guide outlines all physical requirements for the system. It includes space allowances, power specs, network connection points, safety zones, and maintenance access requirements. These documents are built from field data and help avoid guesswork.
Review the guide during the planning phase. Compare your site’s layout and limitations against the guide’s specifications. This helps you identify where adjustments are needed before equipment arrives.
On install day, the guide supports on-the-spot decisions. If a mounting hole location needs to change, or if a conduit path needs rerouting, the guide gives clear limits and alternatives.
Site needs guides are also useful during walkthroughs with clients or facility managers. They explain why certain design choices are necessary and support your team’s professional recommendations.
Using a reference guide shows professionalism. It demonstrates that your team is prepared, precise, and focused on delivering a high-quality, code-compliant installation.
Understanding How Surface Irregularities Affect Installation
Surface conditions play a major role in how well flap barriers function. If the floor is uneven, tilted, or unstable, it can affect everything from alignment to user safety. That’s why identifying and addressing these issues early in the site prep process is critical.
Even small inconsistencies in floor height can cause big problems. A barrier that sits unevenly may not open or close properly. The flaps could scrape the surface or fail to align with sensors. These issues don’t just affect function—they wear out components faster and require more frequent maintenance.
During the site inspection, use leveling tools to detect any slope or tilt. Also look for areas where tile is loose, grout is missing, or concrete has chipped. These are red flags that the surface is not ready to hold a precision access control unit.
If irregularities are found, they must be fixed before installation begins. This may involve grinding down high spots, adding self-leveling compounds, or replacing surface materials. These fixes are easier and cheaper when done before any hardware is in place.
Never try to “make it work” on a bad surface. Shimming or adjusting a heavy flap barrier on an unstable foundation is dangerous and temporary. It creates alignment issues that ripple through the system and frustrate both users and technicians.
Stable surfaces are the base of long-term success. Taking time to prepare them correctly avoids callbacks, complaints, and costly repairs later.
Planning for Conduit and Cable Routing Paths
Cables and conduits are often hidden—but the planning behind them should be crystal clear. During flap barrier site prep, one of the most important tasks is mapping where power and signal lines will go. This affects the look, safety, and reliability of the finished install.
Start by locating where each barrier unit will sit. Then map out how power and data cables will reach it. Consider the most direct route that avoids obstructions, sharp bends, or high-traffic areas. These paths should be easy to access but protected from damage.
If you’re running cables under flooring, confirm there’s enough space and that the surface can be restored cleanly. If you’re using wall conduits or above-ceiling runs, plan for proper supports and junction boxes. Every cable must be secured and protected along its path.
Avoid running power and data cables in the same conduit. This can cause signal interference and performance problems. Keep them in separate runs and follow manufacturer spacing guidelines to ensure clean communication between the flap barrier and access systems.
Be mindful of future maintenance. Will technicians be able to trace and service these cables later? Make sure the routing allows for inspection or upgrades without tearing apart the site.
Thoughtful cable routing adds to system performance and visual professionalism. Sloppy wiring undermines even the best barrier units. When your site setup includes clear, protected paths, the installation team can work faster and the result will last longer.
Marking Locations for Barriers, Sensors, and Brackets
Precision marking is the bridge between planning and execution. Every barrier, sensor, and mounting bracket must be positioned with care. Incorrect markings lead to holes in the wrong places, misaligned flaps, and sensors that fail to detect users correctly.
Start by using layout drawings or installation plans to determine the correct positions for all components. Then transfer those measurements to the actual site using chalk lines, marking pens, or removable tape. Every mark should be verified with a level and tape measure before drilling begins.
Marking is especially important when multiple barrier lanes are being installed. Spacing must be consistent to ensure uniform operation and a professional look. Fluctuations in gap width or unit alignment are easy to spot and affect the user’s first impression.
Sensors should also be marked carefully. These may be wall-mounted, floor-embedded, or bracketed next to the barriers. Their accuracy depends on being exactly where the manufacturer recommends.
Once markings are complete, perform a dry layout with cardboard cutouts or templates. This lets you visualize the system and make last-minute adjustments without damaging the surface. It also gives your team a reference as they begin the physical install.
Good marking prevents mistakes and speeds up the job. It brings clarity to the worksite and eliminates the guesswork that slows down projects. Make it part of every flap barrier site prep plan.
Preparing the Site for Weather or Environmental Factors
Environmental conditions can affect both the installation process and the long-term reliability of flap barriers. That’s why part of site prep includes assessing how weather, lighting, and climate may interact with the barrier system.
For outdoor installations or semi-covered areas, check for exposure to rain, wind, and sun. Make sure the chosen flap barrier model is rated for outdoor use. Look for features like sealed electronics, corrosion-resistant coatings, and waterproof wiring ports.
Also plan for drainage. Water pooling near the base of a barrier can lead to corrosion or electrical shorts. Make sure the floor slopes away from the unit, or that drains are nearby to handle stormwater.
Temperature extremes affect operation, too. In cold climates, barriers may need internal heating elements or insulation to prevent sensors from freezing. In hot areas, ventilation must be considered to avoid motor overheating.
Lighting can also play a role. Infrared sensors may misfire in direct sunlight. Reflective surfaces can confuse optics. During site setup, note light sources and reflections. If needed, adjust barrier placement or sensor angles to avoid interference.
Indoor areas aren’t immune. Dust, humidity, and even HVAC vents can affect barrier performance. Use this stage of prep to identify any environmental threats and build solutions into the install plan.
Barriers should be part of the building—not at odds with it. When site prep includes environmental checks, the result is a barrier system that works day in and day out, regardless of the conditions.
Reviewing Site Preparation Standards and References
Professional installations are guided by more than experience—they’re backed by standards. During flap barrier site prep, referencing trusted industry guidelines helps ensure every detail is handled correctly. These standards outline best practices for layout, safety, wiring, and performance.
Use resources from professional organizations such as ASIS International to align your preparation with global best practices. These documents provide clarity on clearance zones, recommended installation heights, user safety zones, and barrier alignment principles. They also highlight compliance requirements across different building types.
Reviewing these standards early helps avoid conflicts with other building systems or legal limitations. For instance, certain public spaces require minimum space between access points and emergency exits. Others regulate how electronic access control equipment must be installed in high-traffic areas.
These guidelines support your internal checks. They offer extra confidence that your planning is thorough and that the barrier system will be both effective and code-compliant. When clients or inspectors ask for documentation, you’ll have the references to back up your design decisions.
Using industry references during site setup is more than a formality. It shows commitment to quality. It protects your team from oversight. And it raises your credibility on every job.
Final Site Walkthrough Before Installation
Before the crew arrives, a final site walkthrough confirms that everything is ready. This is the last opportunity to spot overlooked issues and confirm that the location can support a fast and smooth installation. A thorough walkthrough eliminates assumptions and turns preparation into action.
During the walkthrough, compare the physical site with your planning documents. Are all conduit paths clear? Is the surface level where each barrier will mount? Are power and data lines within reach of each barrier location?
Inspect all markings. Make sure no floor tiles have come loose. Double-check that electrical boxes and data ports are live and properly grounded. These final checks are your safety net. They catch issues while they’re still easy to fix.
Confirm that safety signage is in place if the area will remain open during installation. Mark off the work zone and ensure that all materials have been delivered and are staged where needed.
Gather the full install team or site supervisors for a final briefing. Review roles, schedules, and access permissions. If anything has changed since the initial prep, update the team before the first tool is lifted.
A final walkthrough doesn’t take long—but it prevents countless issues. It’s the bridge between planning and execution, and it should be part of every site prep routine.
Common Site Prep Mistakes to Avoid
Despite good intentions, some mistakes happen again and again. Recognizing these risks helps prevent them. One common error is assuming the site floor is level. Technicians often start work only to discover gaps under the barrier, which leads to time-consuming adjustments or unstable installations.
Another frequent issue is underestimating user flow. Barriers get placed too close to walls or exits, causing congestion during peak hours. Inaccessible layouts not only frustrate users—they can also violate local regulations.
Poor power planning is another costly oversight. Shared circuits, long cable runs, or overloaded panels result in unstable power delivery. These issues can burn out components or cause the system to fail during high use.
Teams sometimes forget to verify the exact dimensions of the barrier units during prep. If the installation area is smaller than expected, last-minute changes may be needed. This affects mounting and can delay other trades.
Avoid these problems with structured planning and verification. Go slow in the prep phase to go fast in the install phase. When mistakes are caught early, they’re easy to correct.
Applying the Flap Barrier Checklist in Real Projects
To simplify site readiness, apply a structured tool like the flap barrier checklist. This document outlines every key item needed for a smooth install—power checks, floor inspections, clearance zones, safety reviews, and more.
Use the checklist during early planning, then again during the final walkthrough. Make sure each item is marked complete before the crew begins installation. The checklist ensures that nothing is forgotten and that everyone is working from the same expectations.
This approach builds accountability. When each team member knows what to check and when to check it, coordination improves. Progress becomes predictable. And site errors drop dramatically.
Project leads can also share the checklist with clients or facilities staff. This builds trust and transparency and allows clients to understand what’s required from their side.
Checklists don’t slow down work—they speed it up by removing confusion. In high-value installs, they’re an essential part of success.
Linking Site Prep to the Full Install Process
Site preparation isn’t separate from the install—it’s the first phase of it. Every step you take during flap barrier site prep supports the next stage, from wiring to mounting to system testing. The better your prep, the better your outcome.
Once site work is complete, the transition into installation follows the plan laid out in the install guide. Barrier positions are clear. Wiring paths are clean. Team members know their roles. The job flows.
Poor site setup forces the crew to stop and troubleshoot. They must solve layout problems, relocate brackets, or request additional hardware. This isn’t just frustrating—it increases labor costs and delays the project timeline.
Good prep, on the other hand, gives installers everything they need to succeed. It makes their job easier and your results stronger. And it helps ensure the barrier system works perfectly on day one.
Conclusion – Plan the Site Right, Install Without Stress
Great installations begin with great planning. When you prepare your site the right way, you remove the stress and surprises that cause most project delays. You create a work environment where technicians move confidently and systems work as designed.
From checking floor levels to marking conduit routes, from confirming user flow to aligning team efforts, each prep step has a purpose. It ensures performance, protects timelines, and adds value to every flap barrier system you install.
Use the tools, guides, and checklists available. Plan early. Review often. And remember—good preparation is what transforms an ordinary install into an exceptional one.
FAQs
Q1: What’s the most common cause of delays during flap barrier installs?
Poor site preparation, especially uneven flooring or unclear layout markings, often causes delays.
Q2: Do all installations require electrical work before setup?
Yes. Power and data access must be confirmed and prepared during the site prep phase.
Q3: Can flap barriers be installed on tiled floors?
Yes, but only if the tiles are stable and level. Loose or uneven tiles must be repaired first.
Q4: What’s the best way to manage installation teams on-site?
Hold a prep meeting, assign clear roles, and use shared documentation like site drawings and checklists.
Q5: Should I use a checklist even for small projects?
Yes. Even small installations benefit from structured checks to prevent common mistakes.