Checklist: Site Requirements Before Installing Flap Barriers


A smooth and timely flap barrier installation doesn’t start on installation day—it starts much earlier, right at the site planning stage. Too many projects get delayed, cost more than expected, or need rework simply because critical site readiness steps were skipped. That’s a serious problem, especially when access control systems are part of a bigger facility upgrade or a high-security project.
Flap barriers are precision-built, heavy-duty machines. Installing them is not like placing a regular door. From power supply to floor strength to user flow, everything needs to be spot-on. Missing even one detail can create roadblocks later on. But the good news? You can avoid all of that with a simple checklist.
This guide is here to help you. Whether you’re a facility manager, project planner, or part of the installation team, knowing what to look for ahead of time will keep things moving smoothly. We’ll walk through every key flap barrier site need—flooring, spacing, lighting, safety measures, and communication channels. Everything you need to check before the barriers even arrive.
So let’s dive in and make sure your project avoids the common traps. A thorough pre-installation checklist doesn’t just save time—it saves headaches, money, and reputation. Let’s get it right from the start.
Understanding Flap Barrier Systems
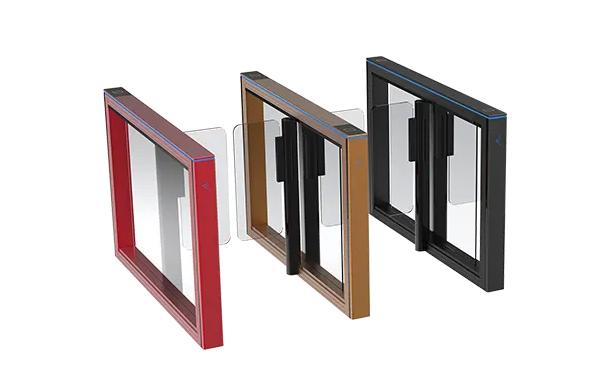
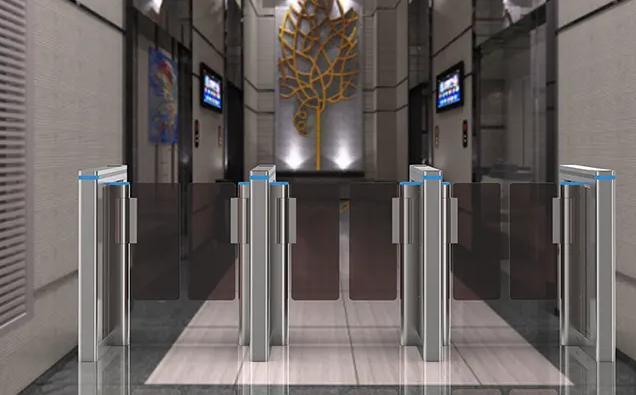
Before preparing your site, it’s important to fully understand what a flap barrier is and what it requires. These are automated access control gates, typically installed at building entrances, office lobbies, metro stations, or any place that needs controlled pedestrian flow. They work with sensors and motor-driven flaps that open and close automatically, allowing only authorized individuals through.
They come in various configurations—single-lane, double-lane, bi-directional, or uni-directional—and can integrate with access systems like RFID, biometrics, or QR scanners. This means that besides just the barrier, there are electronic and software components to consider too.
Why is this important for installation readiness? Because each flap barrier unit has physical and electrical demands. Their dimensions, power needs, and operational clearance must fit your site exactly. If your site is unprepared, the barrier might not function properly, or worse—it won’t fit.
Also, site conditions vary greatly. A metro station has different needs than a corporate building. The type of users (public, staff, guests), the expected footfall, and even the aesthetic requirements influence which barrier model is selected—and how the site must be prepared.
For an overview of how flap barriers are installed, check out this install guide.
Site Dimensions and Spatial Planning
This is one of the most crucial pre-installation checks. Your site must have the correct dimensions to accommodate the flap barriers. We’re not just talking about width—we mean length, depth, clearance zones, and pedestrian pathways. The barriers must fit with some breathing space, or you risk poor function and unsafe conditions.
Start by accurately measuring the width of the entry and exit points. Account for the number of lanes needed—each lane usually requires about 650 to 900mm of space, depending on the model. Remember, you’ll also need clearance zones for safe entry and exit on both sides.
Then, consider the turning radius for wheelchairs or luggage carts if your location serves the public. You might need to plan for extra space or a wider accessible lane. Fitting too many lanes into a small area can backfire, causing congestion and damage to the equipment.
Think about future upgrades too. Will you want to add more lanes later? Leave space for future expansion now. A cramped setup limits flexibility and may violate local accessibility laws.
Check out this guide on flap barrier site prep for more in-depth space recommendations.
Flooring and Surface Strength
Flap barriers are not lightweight machines. Each unit can weigh 40-80 kg or more. Once installed, the force of daily use—especially in high-traffic areas—means the floor underneath needs to be sturdy, level, and non-vibrating. Weak or sloped floors can lead to serious alignment issues and long-term damage.
Your first task is to confirm the structural integrity of the floor. Is it concrete, tile, wood, or something else? Lightweight materials like laminate or carpet over softboard won’t cut it. Reinforcement may be needed for wood or raised floors.
Next, check for levelness. Even small slopes or gaps under the barrier base can affect sensor alignment and flap motion. Use a spirit level and correct any unevenness with screeding or patching materials.
Floor finish also matters. Highly polished surfaces may need anti-slip treatment to avoid accidents near the barriers. Think about cleaning too—are there drainage or spill concerns in the area?
A good rule of thumb: if the floor isn’t solid and stable enough to support a 100 kg cabinet without wobble, it isn’t ready for a flap barrier.
Traffic Flow and Accessibility
One of the most common reasons for complaints after installation? Poor user flow. Congestion. Confusion. People getting stuck or turning around. All of this is avoidable with simple planning.
First, map how people move in and out of the area. Do they enter in groups or trickle in one-by-one? Are there peak periods—like morning office hours or shift changes? Your flap barrier layout should handle maximum flow comfortably, not just average flow.
Then look at ADA (Americans with Disabilities Act) or local accessibility laws. You might need at least one wider lane, typically around 900 mm, for wheelchair users. This lane should be clearly marked and ideally positioned closer to security or reception.
Also consider alternative paths. Emergency exits should remain unobstructed, and the flap barrier system must not block fire escape routes. Always design with both daily convenience and emergency readiness in mind.
Early planning for user movement ensures smoother operation and fewer complaints post-installation.
Power Supply and Electrical Readiness
One of the most overlooked site requirements before flap barrier installation is the electrical setup. You can’t just plug a flap barrier into any outlet. These systems require stable voltage, proper wiring paths, and sometimes backup power systems to ensure consistent performance.
Start by reviewing the voltage specifications provided by the manufacturer. Most flap barriers operate on 110V or 220V AC, and the requirement can vary by model and region. It’s critical to match the power supply to the barrier’s input to prevent malfunction or long-term wear.
Placement of electrical outlets is the next big thing. Are the sockets close to the barrier installation area? Is the wiring hidden or exposed? You’ll want pre-routed conduits or cable trays under the floor or through walls to hide and protect cables. Exposed wires can be a safety hazard and are prone to damage.
Also consider the electrical load. If you’re installing multiple lanes, each unit draws power. A dedicated circuit with proper load balancing prevents tripping or interference with other building systems.
Lastly, think about power redundancy. In critical areas like hospitals or data centers, losing access control due to a power outage isn’t acceptable. Include an uninterruptible power supply (UPS) or connect to a backup generator.
Getting power readiness right is not optional—it’s essential. It’s one of the first things your installer will check, and if it’s not in place, the whole project gets delayed.
Lighting and Visibility
Imagine a person walking into a dark or poorly lit entry point with an automated flap barrier. It’s uncomfortable, confusing, and unsafe. That’s why lighting is a core part of flap barrier site needs. It doesn’t just help users navigate—it enhances safety and helps the sensors work better too.
Begin by assessing the current lighting levels in the installation zone. Is it uniformly lit? Are there any shadow zones or bright glare spots? Flap barriers work best in well-lit environments. Their optical sensors depend on clean visual input, and low light can interfere with scanning or detection accuracy.
Position lighting so it doesn’t blind the users or create reflections on access devices like card readers or biometric scanners. Overhead lights should be placed to evenly cover all lanes. Wall-mounted lights or spotlights should be adjusted to avoid directly facing users.
Consider daylight variation as well. If your site has natural light during the day and artificial light at night, ensure both scenarios are tested. The lighting system should maintain minimum lux levels at all times, generally around 300–500 lux for safe operation.
Want to dig into industry norms? Check the lighting guidance provided by PMI’s site standards.
Proper lighting doesn’t just help users feel comfortable—it prevents accidents, ensures compliance, and keeps your equipment working optimally.
Safety Compliance and Regulations
No flap barrier installation is complete without checking off safety requirements. These systems are part of your facility’s physical security, so they must meet local and national codes.
Start by reviewing the safety codes relevant to your location. In the U.S., the OSHA safety requirements are the baseline for most installations. This includes proper marking of walkways, trip prevention, emergency exit access, and signage visibility.
Install warning signs to alert users to the presence of automated equipment. If there’s any chance of pinch points or moving parts being accessed, proper guard rails or notices should be in place.
Then there’s emergency planning. Can users exit in case of a power failure? Flap barriers should be configured to open automatically during a fire alarm or power cut, depending on model capability. You’ll also need clear emergency egress signage and access for first responders.
The flooring near the barriers should have anti-slip treatment if there’s exposure to water or heavy foot traffic. Also, verify if fire-resistant materials are used in and around the barrier zone, especially if it’s part of a lobby or public building.
Compliance isn’t just about checking boxes—it’s about ensuring user safety and preventing legal risks later.
Stakeholder Communication
You can have the perfect site and equipment, but if the people involved aren’t on the same page, you’ll hit roadblocks. Communication is critical when preparing a site for flap barrier installation.
Start with the internal team—facilities management, building engineers, and IT. Everyone should understand what’s being installed, when, and where. Share detailed drawings, installation schedules, and power requirements in advance.
Next, loop in the external teams. That includes the barrier supplier, installation crew, and any subcontractors working on electrical or flooring prep. They need access to the site, clear milestones, and real-time updates if anything changes.
Don’t forget your security team. They’ll likely operate the barrier system once it’s live. They should have a say in access control integrations, emergency protocols, and signage placement.
Also, notify tenants or daily users of the space. Let them know what to expect during installation—noise, access changes, timing. Good communication reduces complaints and helps avoid surprises.
A successful install is like an orchestra. Everyone must know their part and when to act. Coordination now saves chaos later.
Pre-Installation Meetings and Documentation
Before the installers arrive, your project team should conduct a pre-installation meeting. This is the final chance to review all plans and prevent missteps. Don’t skip it.
During this walkthrough, gather everyone involved: the vendor, the installer, the building engineer, and the facilities lead. Physically walk the site and check all major points—flooring, spacing, power, lighting, access flow. Each team should confirm readiness based on their role.
Bring documentation to the table. That includes wiring diagrams, manufacturer requirements, installation instructions, and site drawings. Review the timeline and confirm when barriers will be delivered, where they’ll be stored temporarily, and how long installation will take.
Use this time to finalize access control integrations too. Will the barrier work with your existing RFID system? Who’s configuring the software? Are there test credentials ready?
Lastly, lock down your schedule. Confirm downtime windows, after-hours access (if needed), and site access approvals. Misaligned expectations can cause delays, so this step is your last checkpoint before rollout.
Everything hinges on this meeting. Treat it like your final quality control session.
Common Mistakes in Site Preparation
Even experienced teams make errors when preparing for flap barrier installations. Some mistakes seem small at the start but create big issues later. Knowing what to avoid is just as important as knowing what to do.
1. Skipping Floor Strength Tests:
Many teams assume the existing floor is strong enough. But flap barriers are heavy and bear constant pedestrian impact. Without testing the floor’s load-bearing strength, you risk long-term damage. Tiles may crack, units might tilt, and repairs will be costly and disruptive.
2. Ignoring Electrical Mapping:
Often, teams don’t plan wiring paths early on. As a result, installers face problems like distant outlets, tangled cords, or power drops. Worse, last-minute drilling to hide cables can delay the entire project. Always confirm cable routes and outlet locations during planning.
3. Underestimating Pedestrian Flow:
Flap barriers installed in bottleneck-prone zones will create congestion. Teams frequently base decisions on average traffic instead of peak-time usage. This results in long queues, frustrated users, and potential damage due to forced use. Always size your system for the busiest time of day.
4. No Emergency Mode Configuration:
Some flap barriers lock in place by default during power outages or fire alarms. If not configured correctly, they could block emergency exits. Always confirm how your model behaves in emergencies and program a fail-safe open mode if needed.
5. Not Testing Before Go-Live:
Launching the system without a dry run leads to unexpected errors. Users may not understand how to scan access cards. Security staff might not be trained. Always schedule a pilot test—preferably with live users—to fix issues before the official launch.
Avoiding these mistakes can save you weeks of frustration, repair costs, and safety incidents.
Using Resources to Improve Site Prep
Smart project managers don’t go it alone. They use every available resource to ensure site readiness. From internal documentation to online tools, support is available—you just need to know where to look.
Internal Tools and Guides:
Start by reviewing product-specific guides. For example, Turboo Turnstile offers detailed manuals and diagrams that specify space, power, and integration requirements. Their flap barrier checklist is a great start for beginners and pros alike.
On-Site Vendor Support:
Most reputable barrier providers offer pre-installation consultations. Use them. Ask your vendor to visit the site, review dimensions, inspect the flooring, and check wiring plans. Their feedback can spot issues early and provide solutions specific to your setup.
Online Industry Standards:
Beyond product help, review global best practices. PMI’s project management standards provide detailed guidance on how to plan site-based infrastructure projects like this. You’ll find tips on scheduling, stakeholder coordination, and quality assurance.
Training and Support Teams:
If your team is unfamiliar with barrier installations, consider vendor training. Many offer live sessions or tutorials that walk teams through installation steps, troubleshooting, and maintenance. Proper training reduces installation errors and extends equipment life.
Use every guide, checklist, and expert you can. The more informed your team is, the smoother your project will go.
Final Pre-Installation Walkthrough
Just before the installation begins, do one final walkthrough of the site. This isn’t the time to guess—it’s your last chance to verify everything is ready.
Checklist Verification:
Go through the full checklist (more on that in a moment). Has every step been completed? Measure the space one more time. Check that the floors are level and free of debris. Ensure the power supply is in place and functional.
Mock Test Runs:
If possible, simulate foot traffic through the planned path. Walk through each lane, both directions, and observe potential friction points. Watch how groups or individuals move. This helps identify awkward transitions, blind spots, or crowding areas.
Installer Coordination:
Meet with your installation team and review the timeline. Confirm when each barrier will be delivered and where it will be stored before placement. Discuss the installation sequence—lane by lane or simultaneous install? Set expectations clearly.
Contingency Planning:
Ask yourself: what’s the backup plan if something goes wrong? Have extra materials on-site (mounting kits, cable ties, sealant). Confirm technician contacts and escalation procedures. Better to overprepare now than scramble later.
This walkthrough is your final gate before moving into active install mode. Take it seriously—it can prevent post-install surprises.
Conclusion
Installing a flap barrier isn’t just about placing equipment—it’s a full-site readiness exercise. From verifying floor strength and power availability to planning for traffic flow and emergency scenarios, every detail matters.
By starting with a clear plan and using this pre-installation checklist, you ensure your team avoids the most common pitfalls. You reduce delays, cut costs, and deliver a system that works flawlessly from day one.
Take the time to prepare right. In infrastructure projects like this, the groundwork makes all the difference.
FAQs
1. What is the ideal floor type for flap barrier installation?
Solid, level concrete or tile floors are best. Avoid wood or soft materials unless reinforced.
2. How do you measure space requirements for flap barriers?
Measure lane widths (typically 650–900mm per lane), plus extra clearance on both entry and exit sides.
3. What electrical power specs are needed?
Most barriers use 110V or 220V AC. Check your model’s power needs and plan for nearby dedicated outlets.
4. Who should be involved in pre-installation checks?
Include facility managers, electrical teams, security staff, and the installer. Everyone has a role to play.
5. What lighting levels are recommended for safe barrier use?
Aim for 300–500 lux in the installation zone, with even coverage and no harsh shadows or glare.
Share on Social: