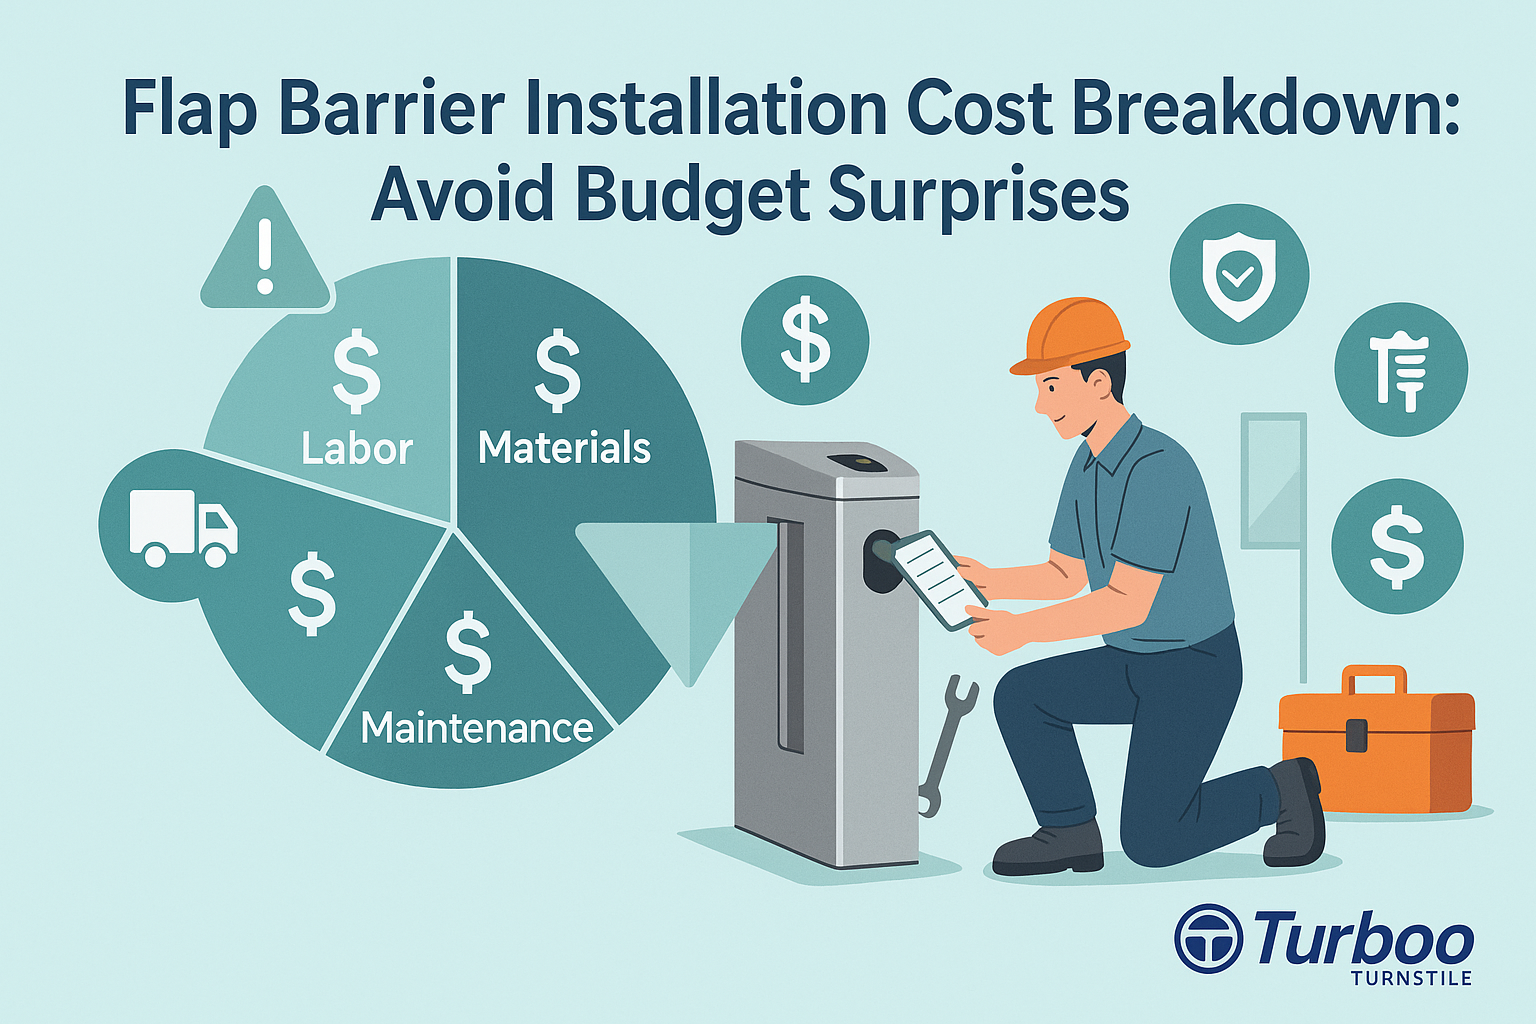
Flap Barrier Installation Cost Breakdown: Avoid Budget Surprises

Planning a secure entry point usually starts with finding the right flap barrier model. Many teams spend days comparing features, prices, and vendors. But when the installation bill arrives, it’s often a shock. The numbers are higher than expected. Why? Because they didn’t budget for the full scope of setup.
This is a common mistake. Buyers focus on unit price but forget that getting a barrier from the box into daily use takes skilled labor, power connections, structural work, and software setup. These are not minor add-ons. They’re major parts of the total cost—and skipping them in your budget can lead to serious delays or financial stress.
The truth is, flap barrier installation cost depends on far more than just the hardware. Site layout, wiring access, civil readiness, and software complexity all matter. Some sites are simple; others need trenching, new concrete, or full integration with building access control.
This guide will walk you through everything. From labor and cabling to alignment and software, you’ll see exactly what makes up installation charges—and how to plan for them. No more guessing. No more surprise invoices. Just clear, practical guidance to build a better budget.
The Difference Between Product Price and Setup Charges
When buyers see a quote for a flap barrier system, they often assume it includes everything needed to get the barrier working. That’s rarely the case. Most quotes focus on the hardware: the actual barrier unit, control board, and sometimes basic mounting gear. What’s missing? Everything else required to install and integrate it properly.
The product price covers manufacturing, shipping from the factory, and maybe a power supply. It usually does not cover delivery to your site, labor for setup, electrical wiring, or configuring software to connect to your access control system. That’s where setup charges come in.
Installation charges are separate because every site is different. A small office may need just a few hours of work. A busy transit terminal may need a full week with electrical trenching, software integration, and multiple technicians on site. There’s no flat rate that fits all.
Understanding this split helps avoid miscommunication. When you budget, don’t assume that buying the unit means it’s ready to go. You need to plan for both: the product and the process to install it. And it’s the process that often drives up total spend.
Labor Costs and Technician Time
The heart of any flap barrier installation is the labor. Skilled technicians do the work of placing the barrier, aligning it to the entry path, securing it to the floor, and connecting it to power and software. This work takes time, and time costs money—especially when high-precision or licensed contractors are involved.
Labor rates vary by region. In major cities, expect higher charges due to local wages, permit rules, and service demand. Rural areas may have fewer technicians available, which also pushes rates up. On average, labor makes up 30 to 50 percent of total installation cost.
Labor cost also depends on system complexity. A single-lane barrier with plug-in power might take a few hours. A six-lane install with reader integration, dual access paths, and safety sensors could take several days. That time multiplies the labor rate—and your final bill.
Remember to ask your vendor what’s included in the labor charge. Some providers handle installation in-house; others subcontract. Make sure the labor plan is clearly listed in your quote. If it’s vague or missing, expect a surprise later.
Electrical and Wiring Requirements
Every flap barrier needs power. Some models require standard voltage, while others need custom wiring to match security or building control systems. This is a major installation cost driver, especially when existing infrastructure isn’t ready.
If the site doesn’t already have power where the barrier is going, new conduit may need to be installed. This can mean trenching, cutting into walls or floors, or adding surface-mounted boxes. These changes require time, tools, and sometimes permits.
Cabling isn’t just about power. Communication cables are also needed—especially when the barrier links to ID badge readers, biometric scanners, or security control panels. These wires must be run cleanly, hidden from view, and protected from damage. The more complicated the wiring, the more expensive the job.
The age of the building also plays a role. In older sites, wiring upgrades may be required to meet modern electrical codes or to handle the power load of a new system. All of this adds cost—and none of it is included in the base unit price.
Good vendors will discuss power needs during the quote phase. If yours hasn’t asked about wiring yet, that’s a red flag. Address this early to avoid major cost surprises during install.
Civil Work and On-Site Construction
In some projects, the flap barrier installation cost rises fast because of civil work—especially when the space isn’t already prepared. These are the physical changes made to floors, walls, or the surrounding area so the unit fits and functions properly.
Common tasks include trenching for wires, pouring new concrete pads, or modifying tiles to anchor the barrier housing securely. If your site has uneven floors or non-standard entry layouts, you may also need shims, brackets, or custom fittings. These jobs add material costs and extend the install timeline.
Alignment is another overlooked detail. For a barrier to operate smoothly, it must sit perfectly straight across the entry lane. A small misalignment can cause the flaps to jam or sensors to misread. Getting the alignment right sometimes involves laser tools, reworking the ground surface, or adjusting nearby fixtures.
Some locations also require safety zoning, bollard placement, or glass partitions to manage traffic flow. These extras may not be listed in the product catalog, but they’re part of a safe and functional install. And they cost money.
The best way to limit civil expenses? Start early. Ask your supplier to inspect the site before quoting. They’ll identify these issues in advance—and that’s how you stay on budget.
Software Configuration and System Integration
Installing a flap barrier doesn’t end with placing it on the floor and turning it on. In most cases, the system needs to be linked to your access control platform. That might mean card readers, face scanners, time attendance software, or centralized security management dashboards. And that’s where software configuration becomes a critical cost driver.
Integration involves more than plugging in cables. The flap barrier needs to be programmed to recognize valid inputs, manage alarm responses, and log activity. That often requires IT coordination, technical know-how, and sometimes even remote support from the vendor. The more complex your access system, the more time integration takes.
Software alignment can add costs you didn’t see coming. If your system uses outdated firmware or proprietary access software, bridging it to the new barrier may require middleware or custom coding. Some suppliers charge for API licenses or setup packages.
It’s important to know whether your existing security setup is compatible. If not, extra tools or support hours may be needed. This is why asking early about software integration and involving your IT team in the installation planning makes a big difference.
When budgeting for flap barrier installation cost, always include time and fees for software testing, debugging, and user training. These parts aren’t optional—they’re essential to a working system.
Site Preparation and Layout Coordination
Not every site is ready for barrier installation on day one. Sometimes, doorways need to be widened, furniture must be moved, or walls must be modified to allow a clear flow of traffic. These site readiness steps are rarely included in initial cost discussions—but they impact both schedule and spend.
This is where early coordination pays off. Using site prep advice, you can evaluate whether the barrier will fit in your current layout. Is there enough clearance? Are floor materials stable enough for drilling? Will nearby elements block sensors?
Planning these details ahead of time helps you avoid on-the-spot fixes that cost more. Last-minute changes are often rushed, less durable, and more expensive due to the need for emergency labor or materials.
One of the biggest site-related issues is spacing. Barriers need a specific distance between units and from walls to function correctly. If these gaps aren’t built in, installation either becomes impossible—or involves patchwork solutions that increase total cost.
Getting a layout drawing and walkthrough before placing the order helps your team and the vendor align expectations. It also lets you schedule any prep work well in advance, avoiding costly project delays.
Shipping, Handling, and Delivery Coordination
A flap barrier might weigh over 50 kilograms and include fragile components like motor gearboxes and sensor arrays. Shipping such equipment isn’t like sending office supplies. It involves specialized packaging, careful handling, and sometimes custom freight arrangements—all of which cost money.
If the delivery is local, transport may be included. But for larger or international orders, freight, insurance, and customs fees can quickly add up. You may also be charged for liftgate delivery, warehouse offloading, or holding fees if your site isn’t ready when the product arrives.
Some vendors require delivery to be accepted by a technician. Others offer dock-to-door service. If your team isn’t available or your building has time-limited delivery access, rescheduling fees can apply.
Handling also becomes more complex if the product has to be moved across floors, down stairs, or into secured areas. In those cases, you may need extra equipment or labor to manage the move.
Discuss these logistics upfront. Ask how shipping is handled and what you’re responsible for. Planning around this avoids last-minute charges that blow past your original budget.
Vendor Service Plans and Optional Support Packages
Installation doesn’t stop when the barrier powers on. Over time, systems need calibration, sensor tweaks, and software updates. That’s where vendor support plans come in—and they’re another key factor in your total cost picture.
Some suppliers include 12 months of support. Others offer paid plans with priority service, remote diagnostics, and fast-track parts shipping. While these may seem optional, they often pay off—especially for high-traffic locations where downtime is costly.
If your team doesn’t have experience managing security barriers, a support package gives peace of mind. You’ll have access to troubleshooting help and routine health checks that catch problems early.
Some vendors offer site visits or training sessions for your staff. These services improve system longevity and reduce future repair costs. Even if they cost a bit more upfront, they protect your investment long-term.
Always ask what’s included in the install quote. If support is separate, ask what levels are available and whether they match your risk profile and usage needs.
Common Pricing Ranges and What Influences Them
There’s no single answer to how much a flap barrier installation costs—but there are patterns. Basic installs for one or two units in a simple indoor environment might range from $800 to $2,000. More complex setups involving multiple lanes, trenching, software integration, and civil work can easily top $10,000.
According to installation data, the average cost for a standard flap barrier install across commercial sites falls between $3,500 and $6,000. That includes basic cabling, barrier anchoring, and access system linking.
City installations tend to cost more than rural due to labor rates, permit requirements, and logistical complexity. Older buildings often require extra work, while new builds or prepped sites can cut costs by up to 20%.
What drives higher costs? Unexpected floor modifications, cable rerouting, legacy system upgrades, or hard-to-reach install areas. What reduces cost? Clear site drawings, accessible wiring routes, and ready access to integration teams.
Knowing these benchmarks helps you judge whether a quote is fair—or missing hidden charges that will appear later.
How to Use a Setup Cost Guide to Budget Right
Many buyers rely on averages or vendor brochures when estimating setup expenses, but averages often mislead. That’s why using a dedicated setup cost guide is essential. These guides break down real cost ranges based on installation type, site environment, and integration needs.
A good setup cost guide starts by asking site-specific questions. How many barriers are being installed? Are you replacing old units or starting from scratch? What kind of access control system is in use? Answers to these questions shape your actual cost—not just a flat rate pulled from a general estimate.
These resources also help buyers see how different line items—labor, wiring, trenching, alignment, and software—add up in stages. Instead of being surprised by a sudden five-figure invoice, you’ll be able to forecast costs in phases: prep, delivery, installation, and integration.
Guides are also useful when comparing vendor quotes. If one company’s cost seems much lower than another’s, a proper setup cost tool helps you check whether key components are missing or underquoted.
This kind of detailed planning makes your project smoother and your accounting more accurate. It also gives procurement teams the documentation they need to get approval for full project funding in advance.
Smart Planning to Avoid Budget Shocks
If there’s one theme throughout every installation cost discussion, it’s this: don’t leave planning until the last minute. A huge number of budget overruns happen because small technical issues weren’t spotted early. These issues become costly only when discovered during installation.
The smartest thing you can do is start by asking the vendor about everything that could affect installation. Will the barrier need its own circuit? Do you need trenching? What does the layout require in terms of spacing? Are your floors level and strong enough to anchor the housing?
You can also learn a lot by following general budgeting tips. These include setting a 10–15% buffer for unforeseen site issues, clearly breaking down cost centers in your request for proposal (RFP), and requesting bundled pricing when ordering both hardware and setup services from the same vendor.
Some surprises will always happen. But good planning means fewer surprises, lower costs, and faster installation.
Use This Pricing Guide to Clarify Totals
Once you’ve gathered all the cost details, it’s time to revisit the overall budget. That’s where the pricing guide becomes useful again—not just for unit prices, but for seeing how setup connects to long-term value.
The guide shows how to balance initial product cost with installation scope and total ownership. If a cheaper model needs double the labor, you’re not really saving money. If a premium model installs faster and offers free setup tools, that might be a better deal overall.
Use this final pricing check to validate your numbers before you commit. Share the guide with your procurement or finance team, and compare it to vendor quotes line by line.
This final review helps you spot missing items, avoid padding your budget with unnecessary extras, and ensure full approval from stakeholders.
Checklist: What to Include in Your Installation Budget
- Labor for setup, alignment, and calibration
- Electrical wiring and access to power sources
- Cabling for access control system integration
- Civil work such as trenching or pad pouring
- Site preparation and layout coordination
- Software configuration and compatibility checks
- Delivery, handling, and special freight requirements
- Vendor service plans or extended support options
- Tools or permits for installation area access
- A buffer for unforeseen costs or site-specific changes
FAQs
Q1: Why is installation not included in most flap barrier prices?
Because setup costs vary widely by site, vendors separate installation from unit pricing. Each site needs a unique plan based on layout, wiring, and integration needs.
Q2: How can I reduce installation costs without cutting quality?
Prepare your site early. Clear wiring paths, accessible power, and proper alignment space reduce the labor hours and complexity of setup.
Q3: Should I use my own contractor for installation?
If they’re experienced with security systems and flap barriers, yes. Otherwise, using the vendor’s team ensures better alignment with product specs and warranty terms.
Q4: Are installation costs different for indoor vs. outdoor barriers?
Yes. Outdoor setups often require sealing, weatherproofing, and heavier housing—which add time and cost compared to indoor installs.
Q5: Can I delay installation after delivery?
You can, but check for storage fees, risk of product damage, or expiration of vendor installation windows. Delays can lead to extra handling charges or schedule conflicts.
Share on Social: