What Are Flap Barrier Wiring: A Technician’s Guide

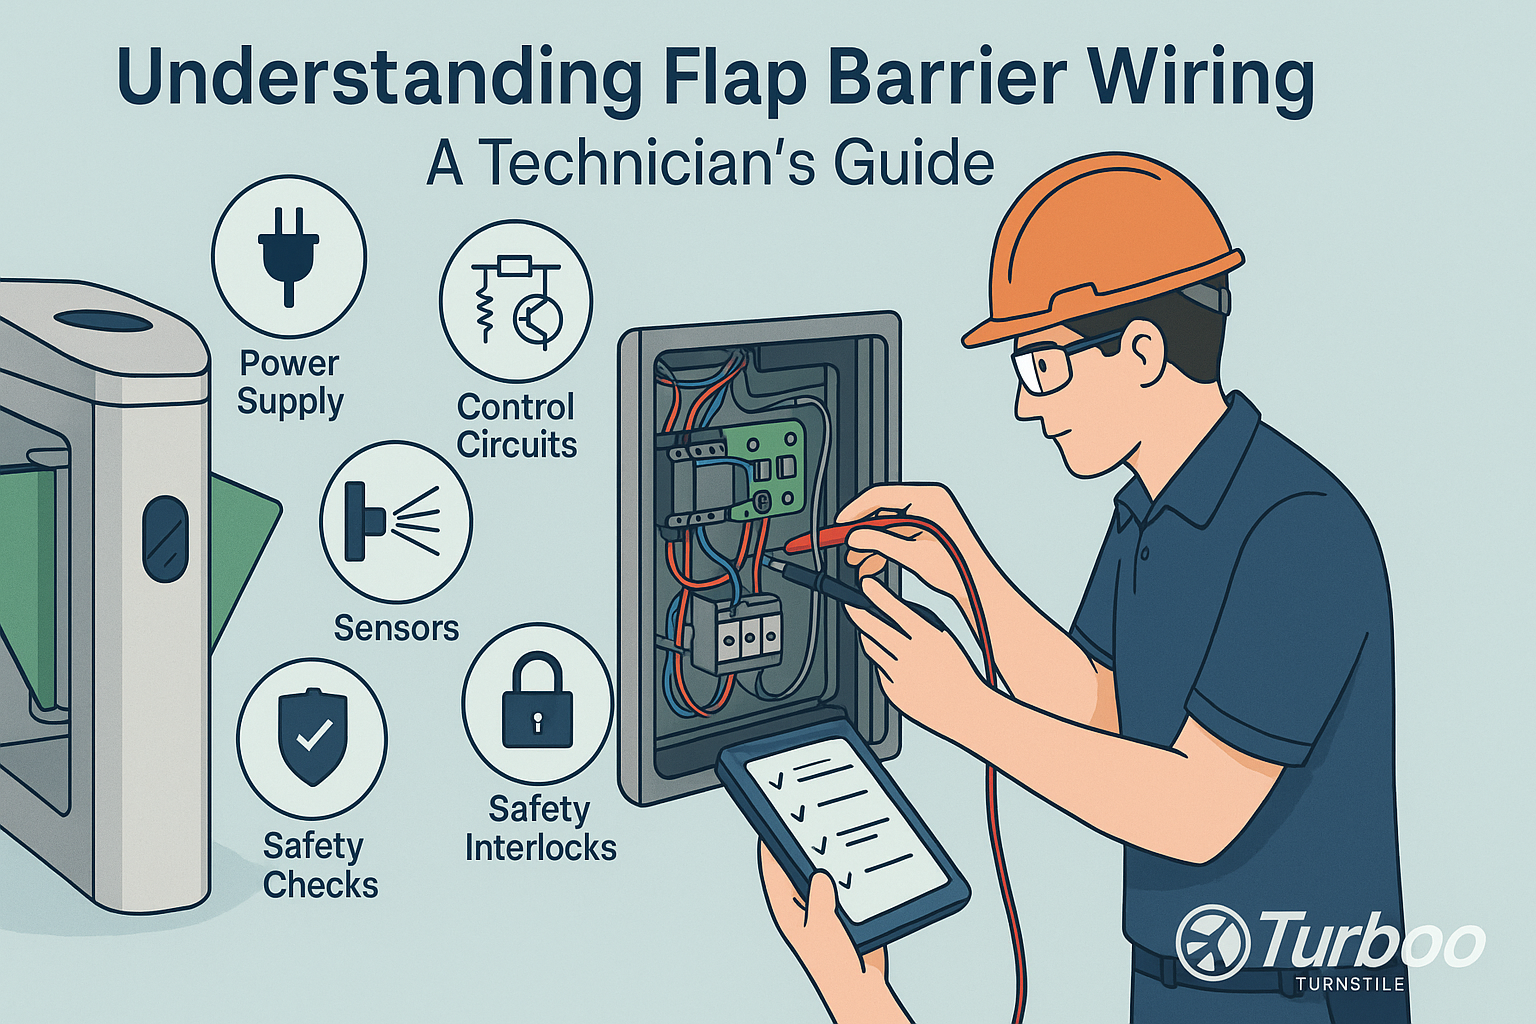
Wiring controls everything in a flap barrier system. From powering the motors to receiving signals from sensors, every function depends on electrical precision. If the wiring fails, the whole setup fails. That’s why understanding flap barrier wiring is essential for any technician, installer, or maintenance crew.
When mistakes happen during barrier wiring setup, the effects are immediate. Short circuits, misread signals, or power loss can stall the barrier or make it behave unpredictably. The barrier might open at the wrong time, not open at all, or trigger alarms without cause.
This guide is built to simplify the wiring process. Whether you’re on a new install or diagnosing an old system, the following sections will walk you through each part—from power planning to final continuity checks. Every explanation is clear, short, and designed for on-site application.
By following these instructions, your work becomes more efficient and secure. You avoid rework, save time, and deliver stable systems that last. Proper flap barrier wiring isn’t just a task—it’s a craft. Let’s start with the foundation of every electrical job: power requirements.
Power Requirements and Load Management
Every flap barrier unit requires a specific power input to run safely. Getting this wrong can mean the system won’t boot—or worse, it burns out internal circuits. Before making any connections, always check the power specs provided by the manufacturer. Most units run on 110V or 220V AC input, but the internal components often operate on lower voltages like 24V DC.
That’s where transformers and power supplies come in. They convert raw power into a stable current that protects sensitive parts like the control board and sensors. If the supply voltage fluctuates or falls below the threshold, the barrier may behave erratically. This is why stable power delivery is one of the most critical steps in the barrier wiring setup process.
You also need to consider load distribution. If multiple flap barriers are installed close together and share the same power line, the total current draw might exceed the line’s capacity. This leads to line drops, overheating, and breaker trips. Each unit should ideally have its own fused line or be connected through a shared distribution box rated for combined loads.
Always inspect the circuit breaker. It should be sized for the maximum expected current with a buffer for surge loads. Motors draw more current during startup, so the circuit should be able to handle these peaks without nuisance tripping.
In addition, make sure your power source has proper grounding and surge protection. Power surges caused by local utility issues or nearby industrial equipment can fry control boards instantly. Installing an inline surge suppressor or using an isolated power module can protect the system.
When the power supply is clean and well-regulated, the entire wiring job becomes easier. You won’t be chasing phantom errors caused by poor voltage or current drops. A reliable power connection is the first step toward a smooth and long-lasting installation.
Control Board Connections
At the core of any flap barrier is the control board. This circuit board manages everything—from motor movement to sensor response to access logic. Getting the control board wiring right is non-negotiable. One wrong pin or crossed wire can stop the system from working or damage the components permanently.
Begin by reviewing the terminal layout. Each model may differ slightly, but most boards include power input, motor control, sensor input, signal relays, and communication ports. Always match the connector to its labeled terminal. Never guess, even if the wiring looks familiar.
Many barriers use removable terminal blocks. These should be inserted securely and tightened properly. Loose wires cause signal instability. Use ferrules or crimped ends to avoid wire strands touching adjacent terminals. A short here could result in a complete system failure.
Use a clear wiring diagram. If you don’t have one, refer to the model-specific install guide. These diagrams show exactly where each wire goes. Take your time. Double-check polarities, especially for DC lines.
Don’t skip labeling. Every wire should be marked on both ends. When you return to the site for future service, labeled wires save hours of tracing and reduce human error.
After connecting all terminals, do a visual inspection. Check for pinched wires, uneven terminals, or contact with sharp metal. If everything looks clean, you can move on to sensor connections with confidence.
Sensor Wiring and Barrier Response
Sensors are the eyes of the flap barrier. They detect people, trigger flap motion, and help prevent tailgating or injury. Poor sensor wiring creates system delays or misfires that frustrate users and create security gaps.
Most flap barriers use infrared (IR) sensors or photoelectric beams. These require precise alignment and a stable power signal to work correctly. Wire these sensors with shielded cables whenever possible to reduce electromagnetic interference from nearby power lines or elevators.
Sensor wires typically include V+, ground, and signal output. Connect each terminal to the correct input on the control board. If the sensors support daisy-chaining, follow the sequence recommended by the manufacturer. Don’t mix input and output wires—it can damage the sensors or the control board.
Keep the wiring runs as short as possible. Longer wires create voltage drops and can degrade signal accuracy. Use separate conduits or cable trays to avoid mixing sensor wires with high-voltage power lines. This isolation preserves signal strength and protects against cross-talk.
Once connected, test each sensor before running the system. Use an object to interrupt the sensor beam and confirm that the flap responds. If not, recheck your polarity and connections.
Sensor accuracy is critical for reliable access control wiring. Without clean signals, the barrier may close too early, stay open too long, or not react at all. Taking the time to wire sensors correctly prevents false triggers and makes the whole system feel more responsive and professional.
Grounding for Safety Compliance
Proper grounding is not just a recommendation—it’s a legal and safety requirement. Every flap barrier system must be grounded to prevent electric shock, system damage, and interference. Poor grounding can cause control board resets, static discharges, and serious safety hazards.
Begin by identifying the main ground terminal in the unit. This usually connects to the metal frame and should link to the building’s main ground line. Use a dedicated ground wire—not the neutral wire—as your safety ground.
If your barrier is mounted on a metallic baseplate, ensure that baseplate is grounded too. This helps dissipate static buildup and avoids voltage leaks through the floor.
Follow local electrical codes and wiring standards when making ground connections. Use green wires for easy identification. Avoid using multi-ground points unless the manufacturer explicitly requires it. Ground loops can introduce signal noise or create shock risks.
Before powering on, test the ground path using a continuity meter. You should read zero resistance between the chassis and the ground point. If the reading is high, check all connections and remove any paint or corrosion blocking the contact.
When done right, grounding keeps your installation safe and your system stable. It’s the invisible layer of protection that makes your wiring work dependably.
Software Integration and Network Wiring
Modern flap barriers rarely work as standalone units. They are part of a larger access control system. That means proper network wiring is essential. Whether you’re connecting to a central control panel or a cloud-based access platform, the quality of your wiring determines how well the barrier communicates.
Start by identifying the integration protocol. Most systems support TCP/IP, RS485, or Wiegand. Each protocol uses a different type of cable and connector. RS485 and Wiegand are often used for direct reader connections, while TCP/IP is used for server-based communication.
For TCP/IP, use high-quality CAT6 Ethernet cables. These should run directly from the barrier’s communication port to a network switch or server. Avoid patching through too many junctions, as this can reduce signal integrity.
For RS485 wiring, maintain polarity and follow the correct daisy-chain topology. Incorrect connections lead to dropped packets or complete loss of communication. Use twisted pair cables and proper shielding to minimize interference.
Wiegand wiring requires even more attention. The data lines (D0 and D1) are sensitive to distance and noise. Keep the run short and well-insulated. Connect the ground wire as well to complete the circuit and reduce signal errors.
If your flap barrier includes a software interface for management or monitoring, test the software setup alongside the hardware install. Confirm that the barrier responds correctly to commands from the management platform. Run test entries and check the log reports.
Always follow guidance from an electrical guide or your manufacturer’s instructions for data connections. Secure all wiring with cable ties or mounting clips. Loose network cables are easily pulled out during maintenance or cleaning.
A smooth software integration doesn’t just improve usability—it adds value to the installation and reduces support calls. Clients expect real-time data and clean access records. Getting your network wiring right helps you deliver exactly that.
Final Testing and Wire Continuity Checks
Once all wiring is complete, the final and most important step is testing. This step confirms that everything is connected correctly and that all parts of the system are communicating as intended. Skipping this test leads to costly callbacks and system failures after handover.
Start with a visual inspection. Look at every terminal, label, and wire path. Make sure there are no loose ends or exposed copper. Confirm that every cable is secure and routed away from sharp edges or moving parts.
Then use a multimeter to check voltage levels at each critical point. Measure at the power terminals, sensor inputs, and control board outputs. Confirm that each reading matches the expected range. Voltage that is too low or too high signals a problem.
Run a continuity test on all ground lines and signal wires. This ensures there are no breaks or partial shorts hidden inside the insulation. If continuity fails, replace or reroute the wire immediately.
Trigger the barrier manually using the access control system. Swipe a card or use a keypad and observe the flap’s response. Watch for smooth movement and quick return. Check both directions and repeat several times. The system should operate the same every time.
Also test the system under load. That means simulating real-world use. Try multiple entries in quick succession. This checks the flap timing, motor response, and sensor reliability.
Before leaving the site, review your work against the official installation or flap barrier checklist. Testing is the only way to prove your wiring setup is both safe and functional.
Barrier Wiring Setup and Real-Life Scenarios
Every installation is different. While the wiring steps may follow the same principles, the on-site conditions can vary. That’s why understanding how to adapt your flap barrier wiring strategy to real-world conditions is so important.
For example, in one project, a technician ran the power and data cables together in the same conduit to save time. At first, the barrier worked. But within days, the system began misreading inputs. The culprit? Electrical noise from the power cable was interfering with the data line. The fix required rerouting the signal wires separately with proper shielding.
In another case, an installer assumed that the barrier’s built-in power supply was isolated. It wasn’t. Connecting it to a shared ground line created a ground loop, which caused minor electric shocks when users touched the flap. That install had to be shut down, rewired, and re-tested from scratch.
These issues highlight why experience matters—but so does following best practices every time. Technicians who apply solid electrical knowledge, use verified site prep layouts, and cross-check connections with diagrams typically avoid such problems.
When barriers are installed in high-traffic areas like metro stations or office lobbies, the stakes are even higher. A single wiring mistake can interrupt access for hundreds of users. That’s why real-life scenarios teach one core lesson—get it right the first time.
Being meticulous with routing, grounding, sensor placement, and labeling might feel slow at first. But it saves hours of rework, protects your team’s reputation, and guarantees better system uptime.
Using a Wiring Guide On-Site
One of the most effective ways to improve wiring accuracy is by using a physical wiring guide at the job site. This could be a printed manual, a laminated terminal chart, or a PDF on a tablet. Whichever format you choose, having a guide at hand simplifies decisions and eliminates guesswork.
Wiring guides typically show you where each connection goes, what color wire to use, and what voltage or signal level is expected at each point. They also help with verifying protocols like RS485 or TCP/IP, which can be easy to mix up without clear visuals.
When installations involve multiple technicians, guides help ensure that everyone follows the same process. They reduce variability and improve team coordination. That’s especially helpful during large-scale projects or phased rollouts where multiple units are being wired at different times.
Guides also help with diagnostics. When an issue appears, you can trace it quickly by comparing the actual wiring to the recommended layout. If something was swapped or skipped, the guide will show it immediately.
Technicians who keep wiring guides in their toolkit are better prepared and more consistent. It’s a simple habit that makes a big difference in the quality of your work.
Managing Multiple Access Points
When you’re installing more than one flap barrier, the wiring challenge grows. Multiple units often share communication lines, power feeds, or access system links. If the wiring isn’t organized, these shared lines can cause interference, signal delays, or system crashes.
Start by assigning separate power circuits whenever possible. If barriers must share a power feed, use isolated fuses or breakers to separate fault zones. That way, a short in one unit doesn’t take down the entire row.
Communication lines, especially RS485 or Wiegand, must be daisy-chained properly. This means connecting unit A to B, then B to C—never branching wires off in random directions. Proper termination resistors should also be installed at the endpoints to reduce signal reflections.
Shielded cables are especially important when multiple units are close together. Without shielding, data signals can bleed from one line to another, causing random misreads. Use conduit where possible and label each wire clearly to track where it goes.
If barriers are integrated with a single access control panel, make sure the panel has enough I/O ports and that each input is matched to the correct unit. Mistakes here can lead to serious confusion, like the wrong flap opening when a card is scanned.
Coordinating multiple access points is complex, but manageable. Clear planning, good cable management, and standard wiring methods make it easier to expand, maintain, and troubleshoot the system.
Troubleshooting Wiring Faults
Even the best wiring jobs sometimes run into trouble. That’s why knowing how to diagnose and fix faults is just as important as doing the install itself. Common symptoms of wiring issues include intermittent flap movement, random resets, unresponsive access inputs, and sensor malfunctions.
Start your check with power. Use a meter to confirm voltage at the terminals. If the power is low or fluctuating, inspect the main feed and test the breaker or fuse. Make sure surge protectors are not tripping under load.
Next, inspect communication lines. RS485 or Wiegand systems often fail silently—everything looks fine until the signals don’t arrive. Check for breaks, loose terminals, and reversed polarity.
Sensor wires should be tested for continuity and proper voltage. If a sensor input isn’t registering, trace the wire from end to end. A bent pin or corroded terminal is often the cause.
Look for physical damage. Sometimes a flap bracket or support frame has crushed a cable. These faults can be hard to see but easy to detect with a multimeter.
The key to troubleshooting is patience and a process. Go step by step, from power to control to signal. And always compare the install to the original wiring diagram or guide.
Tools Every Technician Should Carry
To wire flap barriers properly, certain tools are essential. These include a digital multimeter, wire strippers, crimping tools, cable testers, and small screwdrivers. A label maker or wire tag system helps with documentation. A laptop or tablet with wiring diagrams also makes a big difference.
Don’t forget safety tools—insulated gloves, voltage pens, and protective eyewear. These aren’t just helpful—they’re required on many job sites.
With the right tools and a methodical approach, any technician can perform excellent wiring work that stands up to daily use and future expansion.
Training New Technicians on Wiring Steps
Training your team is vital. New technicians need hands-on practice, but they also need structure. Start them with wiring diagrams and walkthroughs of completed systems. Let them observe how wires are labeled, routed, and terminated.
Then let them try a small section—like wiring a sensor or power input—while a senior tech supervises. Review their work, give feedback, and repeat the process.
You can also use the checklist as a training tool. It reinforces every key step and builds confidence through repetition.
As new technicians gain skill, they’ll start catching mistakes before they happen and contribute more to the install team’s success.
Checklist: Flap Barrier Wiring Essentials
- Confirm Power Supply – Match voltage, isolate circuits, and protect against surges.
- Wire Control Boards – Follow terminal diagrams, use labeled wires, and check polarity.
- Connect Sensors – Use shielded cables, verify signal flow, and test response timing.
- Establish Grounding – Use proper safety ground lines, test resistance, and prevent loops.
- Integrate Software Systems – Use correct protocol lines, test data flow, and configure network settings.
- Run Final Tests – Check continuity, measure voltage, simulate entries, and verify full system function.
Conclusion – Wiring with Confidence
Wiring a flap barrier isn’t just about connecting cables. It’s about creating a reliable, safe, and responsive system. From power inputs to data lines, every wire matters. This guide gives you the knowledge to do it right—from planning to testing.
When your wiring is solid, your installations work better. They last longer. They cause fewer issues. Most of all, they make your clients feel secure and confident.
So whether you’re a new technician or a seasoned installer, apply these wiring principles with care and consistency. Your work will speak for itself—through performance, reliability, and trust.
FAQs
Q1: What causes sensors to fail in flap barrier systems?
Poor grounding or cable interference can cause signal loss or false readings.
Q2: Can I use the same power line for multiple barriers?
Only if it’s properly rated and fused. Isolated circuits are safer and more reliable.
Q3: How do I wire access control software to the barrier?
Use the correct protocol (TCP/IP, RS485, Wiegand), match terminals, and test the signal path with control software.
Q4: What’s the best tool for testing flap barrier wiring?
A digital multimeter with continuity and voltage testing is essential.
Q5: Should I document wiring changes?
Yes. Label all changes, update your diagrams, and share with the client for future reference.