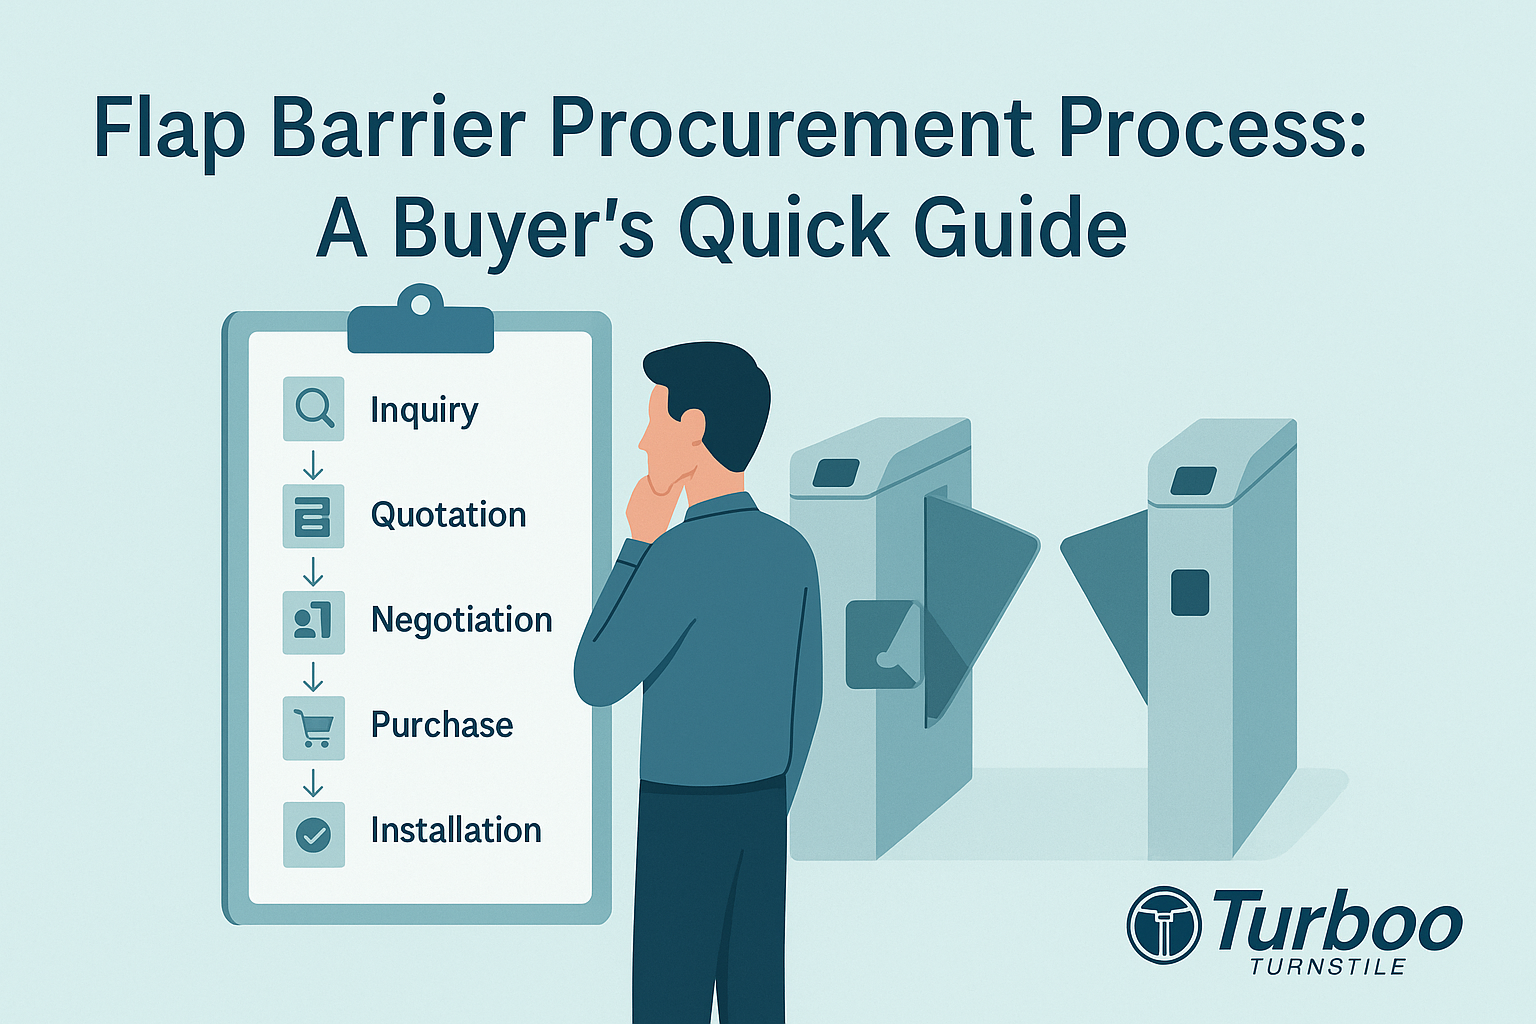
Flap Barrier Procurement Process: A Buyer’s Quick Guide

A facilities manager stands in a bustling corporate headquarters, fielding urgent calls while eyeing the unsecured entrance near the lobby. Security flagged the open access point weeks ago. Leadership is now pressing for a resolution—something reliable, something fast. But procurement isn’t as simple as choosing a brand online. Which flap barrier model meets security requirements without blowing the budget? How will it integrate with existing access systems? And is the supplier trustworthy? With little room for error, the pressure’s on. One wrong call could delay project timelines or compromise safety protocols.
Procurement mistakes can cost time, money, and credibility. Unfortunately, flap barrier procurement is not always straightforward. These systems are now commonplace in airports, government buildings, metros, and even office towers. While they enhance safety and streamline entry control, they’re also deeply technical assets. Making the right buying decision requires more than a few online comparisons. It’s a process—a strategic one.
Here’s where this guide comes in. If you’re a decision-maker juggling site requirements, vendor proposals, and contract approvals, this walk-through simplifies the flap barrier procurement journey. From planning to post-installation review, each step below equips you with practical advice to reduce risk, save time, and improve your outcomes. Let’s break it down.
Why a Clear Sourcing Strategy Matters
Flap barriers aren’t just physical barriers—they’re part of a complex access control ecosystem. Poor sourcing strategies often result in mismatched systems, recurring technical failures, or inflated costs. Think of procurement as your first real investment in how the barrier will perform over time—not just on day one, but in year three, year five, and beyond.
In high-security environments like international airports or data centers, any flaw in access control is unacceptable. Procurement teams must balance several variables: technical fit, supplier reputation, maintenance support, and compatibility with existing software. When one of those elements is overlooked, everything from user experience to safety compliance is at risk.
In public transport terminals, these barriers process tens of thousands of people daily. A delay of even seconds per person causes bottlenecks. Choosing a model with subpar throughput speed or sensors can affect commuter experience, safety, and scheduling. That’s why understanding system capabilities—and sourcing with foresight—is critical.
What’s more, sourcing affects everything downstream: from vendor reliability to software updates. Rushed or unclear procurement leaves room for surprise costs or support gaps. Instead of reacting later, a strong sourcing plan minimizes fire drills and builds long-term reliability into your infrastructure.
Stage 1 – Research and Project Definition
Before issuing requests or reviewing catalogs, it’s essential to define the project’s scope. This initial research phase is foundational—it aligns teams, sets clear expectations, and helps avoid scope creep.
Start with your objectives. Are you managing foot traffic? Improving security? Enabling biometric integration? Objectives shape what features you prioritize. A high-traffic metro station might focus on speed and durability, while a corporate office prioritizes integration with employee badges and a clean design.
Next, outline your performance indicators. Common ones include daily throughput capacity, error rates, downtime metrics, and service response times. These KPIs serve as benchmarks when comparing models or evaluating supplier performance later.
After that, consider technical requirements. Will the flap barrier integrate with your existing card readers or biometric terminals? Does it need to connect with fire alarm systems? Gathering these specs early avoids costly adjustments later in the project.
Don’t overlook physical site conditions. Measure installation space carefully. Note floor type, electrical wiring access, and ceiling height. These influence hardware selection and installation costs.
Lastly, build a requirements document. This file becomes your procurement team’s North Star. Include technical diagrams, security policies, usage data, and future integration plans. It’s a living document—refine it throughout the process.
Stage 2 – Budgeting and Cost Planning
Once your scope and requirements are defined, cost planning begins. Budgeting isn’t just about the upfront price tag. You need to consider the total cost of ownership (TCO), which includes hardware, software licenses, installation, and long-term maintenance.
Start with CapEx: your capital expenses. These are the most visible costs—hardware units, control panels, mounting kits. But remember, cheaper models might come with higher failure rates or lack essential features. What looks affordable now could cost more later in support or downtime.
Next comes OpEx: operational expenses. These include support contracts, spare parts, technician visits, and software upgrades. In many cases, these ongoing costs exceed the original purchase price over a few years.
When planning the budget, also factor in potential project delays. Unclear specs, import issues, or construction hold-ups can stretch timelines. Include a buffer in both time and cost estimates.
Some procurement officers find it helpful to compare vendor proposals with a TCO calculator. It puts all financial elements on one page for comparison—upfront price, training costs, support SLAs, and warranty length.
Also, ask vendors for multi-year service cost projections. That way, you can identify hidden charges that aren’t evident in base pricing. This level of visibility helps avoid surprises—and build a procurement case that finance teams can trust.
Stage 3 – Vendor Identification and Screening
Finding the right supplier can be the difference between success and a logistical nightmare. A smooth flap barrier procurement experience depends heavily on vendor transparency, responsiveness, and long-term support.
Begin by sourcing a shortlist of vendors known for reliability. Use networks, referrals, or vertical-specific directories. Avoid unknown suppliers unless they offer robust references and detailed documentation. This is where conducting a vendor check becomes essential. Use tools like vendor check to assess background, performance history, and customer feedback.
After narrowing down potential partners, request technical datasheets and certifications. Do their barriers meet international safety standards? Are they ISO certified? Are materials flame-retardant? Suppliers unwilling to provide documentation upfront should raise flags.
Ask for client references—specifically those with similar project scales. Speak to past buyers about delivery timelines, support responsiveness, and any post-installation issues. A vendor may look perfect on paper but underdeliver on service.
You should also evaluate geographic presence. Can they support your location in case of emergencies? Do they have a technician network? A vendor with a local partner or warehouse will usually resolve issues faster.
Finally, confirm whether they support integration with your software ecosystem. Ask technical teams to validate compatibility before committing. A good vendor will welcome this step—it’s in both your interests.
Stage 4 – Supplier Engagement and RFP Development
Once you’ve shortlisted potential suppliers, the next step in the flap barrier procurement process is formal engagement through a Request for Proposal (RFP). This document must be crystal clear—because ambiguity at this stage leads to misaligned expectations, inflated quotes, or faulty installations.
Your RFP should begin by summarizing your project goals, timeline, and site specifications. Include detailed use cases: Is this for a secure entrance, a public transit system, or a staff-only back entrance? Vendors interpret requirements differently—precision ensures responses are relevant and actionable.
Clearly state technical requirements: throughput rate, directionality (bi-directional or single entry), safety sensors, tamper alerts, and integration points with your current access control systems. Also mention the preferred communication protocol (e.g., RS485, TCP/IP) if integration with an existing server is needed.
Performance expectations must also be defined. Include metrics such as operational uptime (e.g., 99.5% or higher), support response times, and acceptable mean time between failures (MTBF). These set a baseline for evaluating performance after deployment.
Furthermore, specify warranty expectations, training needs, post-sale support, and service level agreements (SLAs). This ensures vendors price support accurately—not as an afterthought. You can learn how to construct strong RFPs by referencing sources like the procurement process standard.
Lastly, confirm submission requirements—deadlines, proposal format, and required supporting documents. If you need sample installations or pilot setups, include that request here. Clear communication up front prevents confusion and wasted resources.
Stage 5 – Evaluating Proposals
Evaluating supplier bids is more than picking the lowest price. This stage needs a methodical scoring approach—one that weighs both cost and performance across technical and operational dimensions.
Start by assembling an internal review team. Ideally, it should include representatives from facilities, procurement, IT/security, and finance. Each brings a unique lens. For example, IT can spot integration conflicts, while finance can flag future cost implications.
Develop a scorecard that breaks down evaluation criteria. Common components include:
- Hardware specs match (sensor type, throughput)
- Integration readiness (software compatibility, interface clarity)
- Lead time and delivery risk
- Warranty terms and SLA coverage
- Reference strength and past performance
Every submission should be reviewed against this consistent matrix. This removes subjectivity and highlights where vendors cut corners or overcharge for minor features.
One vital filter: verify system compatibility. Have your IT or integration partner cross-check whether the proposed systems connect with current infrastructure. Avoid systems that require massive overhauls or lock you into a proprietary ecosystem.
Schedule follow-up calls or demos with top vendors. This gives your team an opportunity to ask clarifying questions and evaluate communication quality. Use this phase to also assess their ability to conduct site surveys or prototype deployments, which is especially useful in larger installations.
In cases of doubt or tight rankings, conduct an on-site visit to existing installations run by the vendor. Seeing performance in a real environment can be more revealing than any datasheet.
Stage 6 – Contract Negotiation
When it’s time to move from proposals to agreements, clarity is your best defense. Contracting defines the responsibilities, timelines, warranties, and protections involved in your flap barrier procurement. Done right, it limits surprises and ensures service consistency.
First, confirm delivery schedules. Flap barriers often have components that require import, customization, or certification. Clarify the lead time for each part—control panels, sensors, flaps—and what delays might trigger penalties.
Payment terms should be performance-based. Rather than paying 100% upfront, structure progress payments tied to milestones: site survey, delivery, installation, commissioning. This motivates on-time delivery and aligns vendor incentives with your outcomes.
Next, define the warranty terms. A standard warranty might last 12 to 24 months, but clarify what’s included: parts? labor? on-site technician visits? Get it in writing. Ambiguity here can result in unexpected service charges later.
Service agreements are critical. Detail the service response time (e.g., 24 hours or less), escalation protocol, and resolution timelines. If your building is high-security or high-traffic, you may need 24/7 service or an onsite technician presence.
Another overlooked clause: liability and risk allocation. Who’s responsible if the barrier malfunctions and causes injury? Your legal team should review these provisions carefully.
Lastly, include change control processes. Projects evolve—requirements shift or timelines stretch. The contract should define how scope changes are approved, priced, and documented.
Stage 7 – Installation and Delivery
You’ve signed the contract—now the physical work begins. Coordinating delivery and installation requires precision. Barriers are heavy, require secure transit, and must be installed in compliance with safety and building codes.
Start by aligning with your facilities and IT teams to finalize the installation timeline. Avoid scheduling during peak facility use. If night shifts or weekend installs are necessary, confirm vendor availability.
Next, confirm delivery specifics with your vendor. How will the systems be transported? Are unloading tools required? Will the delivery crew handle setup, or is that your team’s responsibility? These questions should have been addressed in the contract, but reconfirm now to avoid missteps.
On arrival, inspect the equipment. Are the parts intact? Do serial numbers match the packing list? If any discrepancies arise, document them immediately and inform the vendor.
Installation itself can be handled by the vendor or an approved partner. Ensure they follow documented procedures, which should include calibration of sensors, power-on diagnostics, and integration tests with access systems.
After the physical setup, conduct acceptance testing. Simulate both normal and emergency use cases: single entries, tailgating attempts, power cuts. Any inconsistencies should be logged and resolved before sign-off.
Use this stage to also validate that the flap barrier’s safety features—anti-pinch detection, emergency release, visual indicators—perform as promised.
Stage 8 – Training and Handover
A well-installed flap barrier system means little without proper training. This step ensures your staff can operate, monitor, and troubleshoot the system confidently.
Your vendor should provide on-site or virtual training for relevant personnel—security teams, facility engineers, and IT support. Training must cover operational use, emergency overrides, and routine maintenance. Make sure it includes both hands-on sessions and written documentation.
Operators should know how to handle typical scenarios: sensor misfires, unauthorized access alerts, or fire system overrides. A test run with real personnel helps identify knowledge gaps.
Maintenance training is equally crucial. Teach your engineering staff how to inspect the flaps, clean sensor lenses, and check connectivity. Regular checks reduce long-term costs and prevent avoidable failures.
Ask the vendor to supply digital and printed operations manuals. These should be site-specific and cover wiring diagrams, parts lists, fault codes, and safety protocols.
Create a support escalation chart. Who do staff contact at the vendor for Tier 1 vs. Tier 2 support? What’s the expected response time? Document these clearly and ensure they’re accessible to your team.
Don’t forget to register warranties, set up software updates, and confirm that all access credentials are securely configured. This final step ensures your procurement investment is both secure and sustainable.
Stage 9 – Follow‑Up and Performance Review
Procurement doesn’t end when the system is switched on. Continuous follow-up is crucial to ensure your flap barrier procurement delivers long-term value. Once installed, the barriers become part of daily operations—and how they perform directly impacts building flow and security standards.
Start with performance monitoring. Track uptime, fault frequency, and repair turnaround times. Most modern barriers include diagnostic features or support remote health checks. Use this data to assess reliability and determine whether SLAs are being met.
Establish a regular check-in schedule with the vendor—monthly in the early stages, then quarterly once things stabilize. These meetings can highlight issues before they escalate and build accountability. Keep track of vendor responsiveness and adherence to contractual obligations.
Also, gather user feedback. Speak with on-ground personnel and security staff. Are there complaints about detection sensitivity or false rejections? Is the physical layout causing confusion or delays? Real-world usage can reveal shortcomings that specs alone won’t show.
As systems age, plan for lifecycle management. Vendors should provide upgrade paths—new firmware, sensor improvements, or additional modules for evolving needs. Factor this into your long-term infrastructure roadmap.
Maintaining documentation is another often-overlooked detail. Ensure your team updates internal logs when changes or replacements occur. This helps future audits and simplifies future expansion planning.
If significant performance issues arise, use contract clauses to escalate. This might involve requesting system replacements, service credits, or revised SLAs. Post-installation evaluation is not just about maintenance—it’s a tool for protecting your investment and holding vendors accountable.
Common Pitfalls and How to Avoid Them
Flap barrier procurement can be deceptively complex. Even seasoned buyers occasionally stumble. Recognizing the common mistakes early on helps you plan with greater confidence.
One major pitfall is overpaying for features you won’t use. Some models boast facial recognition readiness, multiple authentication layers, or advanced alarms—impressive, but unnecessary for basic access needs. If your building requires only card access, skip premium add-ons. Match capabilities with use case to avoid budget bloat.
Another issue is vendor lock-in. Some suppliers use proprietary protocols or software that restrict integration. This makes future upgrades expensive or limits your choice of support providers. Always prioritize open standards and modular systems that can adapt to future platforms.
Underestimating delivery delays is another frequent pain point. International shipping, customs, and even local holidays can push timelines by weeks. Build buffer time into your schedule—and ask for realistic lead time commitments from your vendor.
Installation surprises also trip up teams. Insufficient site surveys or skipping floor plan checks can lead to wrong-sized units, improper positioning, or power supply gaps. Invest time in detailed pre-install planning.
Finally, avoid neglecting post-delivery support. Some buyers assume the job is done once the system works. But support is the true test of vendor value. A flashy install doesn’t mean much if you’re left hanging during an outage.
Proactive planning at each phase—specs, screening, contracting, follow-up—helps avoid these missteps. Lean on trusted frameworks like the buying guide and apply relevant procurement tips to keep your process grounded and effective.
Leveraging Industry Guidelines
When designing your flap barrier procurement strategy, there’s no need to reinvent the wheel. Professional frameworks and standards already exist to help buyers make informed, structured decisions.
Start with APICS. Their procurement process frameworks provide a comprehensive view of sourcing workflows, supplier engagement, risk mitigation, and performance evaluation. Applying even the basics of their structure can reduce uncertainty and create consistency across purchases.
Another useful resource is the buyer’s guide, which contains real-world comparisons, negotiation tips, and contract templates for physical security solutions. While not flap-barrier specific, it helps structure your financial and vendor risk evaluation processes.
You can also learn from previous installations within your organization. Review past procurement files for turnstiles, biometric scanners, or surveillance systems. See what worked—and what caused delays or budget overruns. Procurement maturity builds with every project.
Finally, stay connected to the supplier market. Attend trade expos, subscribe to facility management forums, and review manufacturer white papers. Technology and compliance standards shift frequently. Staying informed helps you anticipate new requirements and maintain interoperability.
When you combine external guidelines with internal insights, procurement becomes a repeatable process, not a one-time challenge. This builds confidence and earns support from leadership, finance, and operations teams.
Final Takeaways for Effective Procurement
Procurement isn’t just a financial transaction—it’s a strategic commitment. The right flap barrier won’t just control access today; it will shape how people interact with your space for years. That’s why attention to detail matters at every step.
Start strong with clear goals and requirements. Align your project’s purpose with the people and systems it will affect. Involve IT, security, and facilities from the beginning. Their input reduces errors and builds a unified vision.
When engaging vendors, prioritize transparency. Ask hard questions. Test assumptions. Confirm technical claims with real-world validations. Don’t be dazzled by features that don’t support your objectives.
Throughout the process, build in accountability. Contracts should spell out deliverables, response times, escalation paths, and upgrade commitments. Follow through post-installation with evaluations, not assumptions.
Remember, flap barrier procurement isn’t about choosing the fanciest model—it’s about selecting the right fit. A well-matched system improves user flow, strengthens safety, and minimizes support headaches. That’s the real return on investment.
Quick Checklist for Flap Barrier Procurement
- Define project objectives and key performance indicators.
- Document all technical requirements, site specs, and integration needs.
- Plan total cost of ownership (CapEx + OpEx).
- Shortlist vendors based on reputation, references, and documentation.
- Use vendor check tools for supplier screening.
- Create a detailed RFP with performance benchmarks.
- Score proposals using consistent criteria and involve cross-functional teams.
- Confirm compatibility with existing access and security systems.
- Negotiate contracts that include delivery schedules, SLAs, and training.
- Monitor delivery, conduct acceptance testing, and document all results.
- Provide staff training and register warranties.
- Establish a post-installation review and vendor performance meetings.
- Track support responsiveness and prepare for lifecycle management.
- Avoid vendor lock-in by choosing open-standard systems.
- Refer to external procurement tips for ongoing improvements.
FAQs
Q1: What is the average lead time for flap barrier delivery?
Lead times vary but generally range from 4 to 10 weeks, depending on customization, manufacturing origin, and shipping logistics.
Q2: Can flap barriers be integrated with biometric systems?
Yes, most modern flap barriers support biometric integration through standard interfaces like RS485 or Wiegand. Always verify compatibility before purchase.
Q3: How much space is typically required for installation?
Standard installations need at least 1.2–1.5 meters in width per lane, with additional space for wiring and maintenance access.
Q4: What kind of warranty should I expect from vendors?
Reputable suppliers offer 12–24 month warranties covering parts and labor. Clarify what’s included—especially for on-site service and critical components.
Q5: Should I always choose the vendor with the lowest price?
Not necessarily. The lowest bid often omits critical features or support coverage. Balance cost with technical fit and long-term reliability.